Saturday, September 1, 2012

Things I Covet: Vegan Goodie Box


I've obviously been spending more time shopping than cooking these days, largely because I have yet to figure out how to fit cooking experiments into my little monkey's schedule. But I've been super psyched to find that mainstream deal sites like Zulily and Plum District are starting to offer vegan products!

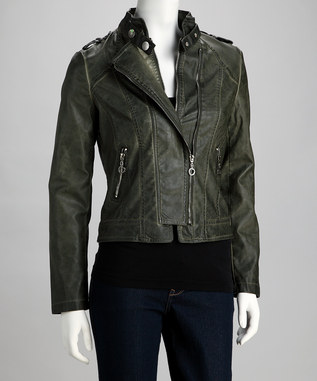
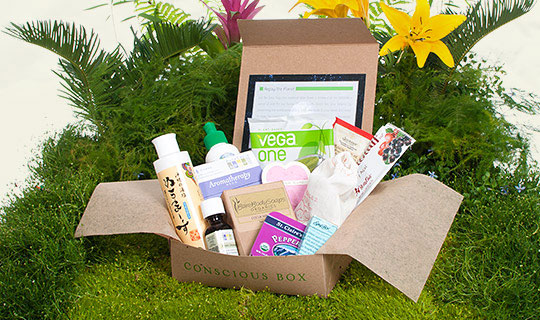
I just snagged this awesome vegan leather jacket the other day and yesterday ordered up this vegan goodie box from Conscious Box. Looks like a great way to sample a bunch of vegan products hand-selected by someone who has way better information and access than I do.

If you're interested in trying vegan products, this looks like a good way to get started. Plum District is offering it up for $20 - and you'll get an extra 20% off with the promo code LABORDAY2012. If you like the stuff, you can get on a monthly subscription that you can cancel anytime.

I believe they're available to order through September 4th. If you do get one, let me know what was in yours - I'm curious if they're all going to be the same...and even more curious as to whether or not I'll like anything.

Fingers crossed =)

Monday, August 27, 2012

Freezing Herbs in Olive Oil

Photos via The Kitchn


I've always wanted to do this. Now I can. And so can you.
Yay.

8 Steps for Freezing Herbs in Oil
Courtesy of The Kitchn

  1. Choose firm, fresh herbs, ideally from the market or your own garden. 
  2. If you wish, you can chop them fine. Or leave them in larger sprigs and leaves. Here I froze a combination of finely-chopped and whole herbs such as rosemary, fennel stalk, sage, and oregano. 
  3. Pack the wells of ice cube trays about 2/3 full of herbs. 
  4. You can mix up the herbs, too; think about freezing a bouquet garni of sage, thyme, and rosemary to add to winter roast chickens and potatoes! 
  5. Pour extra-virgin olive oil or melted, unsalted butter over the herbs. 
  6. Cover lightly with plastic wrap and freeze overnight. 
  7. Remove the frozen cubes and store in freezer containers or small bags. 
  8. Don't forget to label each container or bag with the type of herb (and oil) inside!
For more details, you can read the entire post here.

Saturday, August 25, 2012

Things I Covet: Paparazzi Vegan Leather Jackets

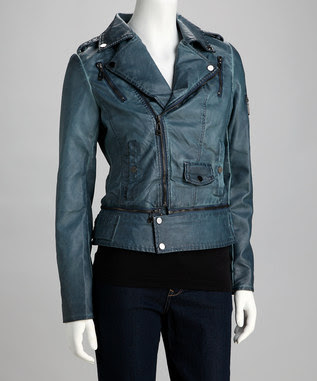
Wow. Vegan "leather" has come a long way. This wicked cool vegan leather jacket = MINE!


Admittedly I do NOT have a closet full of faux leather, largely because I've personally found it to be too oft devoid of style. I never could quite comprehend why vegan clothing products had to LOOK vegan - meaning that I always found the styling to be a little "off". A little too hippie, or hipster, or just plain hip, for me. I realize it's a highly subjective personal preference, but like my take on vegan food, I like it much better when I don't have to sacrifice what I consider to be good taste.

Enter: PAPARAZZI by Biz
Based out of LA, Biz was born with a desire to bring a breath of fresh fashion to women's wear. Since 1969, they have grown to include several private labels, including PAPARAZZi ̶ a line of stylish outerwear for the contemporary woman. Featuring functional pieces and high-quality detail, this collection of jackets, trenches and more will see you from spring showers to fall breezes with ease.
So says the description on Zulily, a members-only online store which appears to be one of the few sources of these fabulous pieces. If you're not already a member, sign yourself up here (it's totally free) and check out these cool jackets. Normally priced from $150-175 (that's assuming you can actually find them elsewhere), they're on sale for $49.99 until tomorrow. Sorry for the short notice but I've only just discovered them myself and wanted to share.

If you pick one up post a pic on the Sneak Vegan Facebook page so we can all covet your new piece of awesomeness.  And if anyone knows where else to find this brand, please let me know =)

Monday, May 28, 2012

Caramelized Onion and Olive Focaccia

Dear Readers,

My most sincere apologies for being MIA for so long. But rather than offer up my perfectly legitimate - and actually, quite excellent - excuse, I thought you might appreciate a simple recipe instead. This one is truly beyond outstanding. Enjoy...


Caramelized Onion and Olive Focaccia 
adapted from this recipe by Tyler Florence

Ingredients 
2 teaspoons rapid-rising dry yeast 
1 cup warm water 
2 tablespoons sugar 
3 1/2 to 4 cups flour (I used 3-1/2ish) 
1 tablespoon coarse salt 
1/4 cup olive oil 
Cornmeal, for dusting 


Toppings
2 tablespoons olive oil 
2 onions, diced 
2 garlic cloves, minced 
15-20 Kalamata olives, pitted and quartered 
1/4 cup shredded Parmesan
1 tablespoon coarse salt 
Freshly ground black pepper 
2 tablespoons fresh rosemary

 In the bowl of a standing mixer fitted with a dough hook, proof the yeast by combining it with the warm water and sugar. Stir gently to dissolve. Let stand 3 minutes until foam appears.

Turn mixer on low and slowly add the flour to the bowl. Dissolve salt in 2 tablespoons of water and add it to the mixture. Pour in 1/4 cup olive oil.

When the dough starts to come together, increase the speed to medium. Stop the machine periodically to scrape the dough off the hook. Mix until the dough is smooth and elastic, about 10 minutes, adding flour as necessary.

Turn the dough out onto a work surface and fold over itself a few times. Form the dough into a round and place in an oiled bowl, turn to coat the entire ball with oil so it doesn't form a skin. Cover with plastic wrap or damp towel and let rise on the stovetop or other warm place until doubled in size, about 45 minutes.

Coat a sheet pan with a little olive oil and corn meal. Once the dough is doubled and domed, turn it out onto the counter. Roll and stretch the dough out to an oblong shape about 1/2-inch thick. Try not to roll the ends out thinner than the middle or you'll end up with crispy ends and a semi-raw middle. If anything, err on the side of a thinner middle and a thicker border...

Lay the flattened dough on the pan and cover with plastic wrap. Let rest for 15 minutes.

In the meantime, preheat oven to 400 degrees F.  Coat a small saute pan with olive oil, add the onion, and cook over low heat for 15 minutes until the onions caramelize. Uncover the dough and dimple with your fingertips. For added aesthetics, poke around the dough with a fork to make those nice little holes.

Brush the surface with more olive oil and then add caramelized onions, garlic, olives, cheese, salt, pepper, and rosemary. Bake on the bottom rack for 15 to 20 minutes.

Buon appetito!!

Damn, it's good to be back =)

Tuesday, February 28, 2012

Growing Up Vegan

So this is something I've been wondering about for a while.

I mean, it's fine for me to make certain dietary choices for myself and even for the Bear, but do I have the right to make these choices for my kids? Is it healthy? Is it safe? Is it even legal??

There's certainly no shortage of cookbook authors and bloggers offering up family-friendly recipes (I've made several from this book that have gotten my nephews up for seconds), all of whom swear adamantly that their kids love being vegan...but I've always been curious about what the kids actually have to say about it themselves.

For anyone else who's been curious about raising a vegan family, here's a little inspiration...

Belated kudos to my dear friend Marla Rose and her awesomely cool kid Justice, the 9-year old vegan, whose simple school video project has recently inspired an international dialogue and continues to feed a healthy global debate:


Can't say for sure that this video sparked this special interest piece, but ABC just aired the Special Segment: Growing Up Vegan:


I suppose I need not make these kinds of decisions until I actually have kids, but I'm rabidly curious about the concept nonetheless. Anyone else out there having a good experience raising vegan kids? If so, please share!!

Thursday, December 8, 2011

Coconut Cowboy Coffee

Photo courtesy of Gretchen at Kumquat
Ciao Ragazzi!

As some of you might have noticed, I've been MIA for a stretch. It's been fun, but I've missed you.

Lots of craziness going on - some of which I look forward to sharing when I can - but the nutshell version is that I've been displaced by yet another international transition and separated from both my beloved kitchen and my tiny (but comfortable, familiar and organized) workspace and, as a result, have been in a bit of an uninspired funk.

In any case, I stumbled across this lovely little bit of heaven that snapped me out of said funk and bookmarked it immediately for that glorious day when I can finally make myself a decent cup of coffee again - and since I have been terribly selfish hoarding all my fabulous little finds over the past couple of months, I felt compelled to pass this one on because..well, someone should be able to enjoy it immediately.

Ironically, I don't even really LIKE coffee - but this simple but fabulous little trickeroo from Gretchen at Kumquat - one of my new favorite gluten-free blogesses - has me slapping my veins wanting to shoot it intravenously...

Alas, methinks I will wait until my moka is unpacked. Just another couple of weeks...

In the meantime, please indulge and enjoy...


Coconut Cowboy Coffee
recipe courtesy of Kumquat
Serves one

1 cup canned unsweetened coconut milk
1 cup hot, brewed strong coffee
3 tablespoons chocolate syrup

Heat coconut milk in small saucepan until steamy. If desired, froth with a steam wand or aerator.

Combine coffee, chocolate syrup and coconut milk.

Yup, that's it. Sometimes the simplest things is life are all we need...

Enjoy =)

Thursday, September 22, 2011

Zucchini Bread Oatmeal


Ok, so I fully admit to being skeptical when I first saw the recipe - zucchini and oatmeal are two things I'd never expect to be in my mouth at the same time. But we've been so overwhelmed with zucchini this season that I've been putting it in just about everything. If you liked the Cherry-Zucchini Bread (we can't stop eating it), trust me when I say, you MUST try this!

It's the absolute most perfect warm-up for these unseasonably chilly fall-ish mornings. I'm not quite ready to let go of summer yet, but alas, if I must, this little bowl of heaven is going to make it a lot easier.

Buon appetito!

Zucchini Bread Oatmeal
Recipe courtesy of Oh She Glows
Serves 1

1/3 cup rolled oats
1 cup non-dairy milk
1 teaspoon ground cinnamon
a pinch of salt & nutmeg, to taste
1/2 cup finely grated zucchini (packed)
1 tablespoon chia seeds or ground flax
1 tablespoon raisins, cranberries or the dried fruit of your choice
2 tablespoons chopped pecans (walnuts are good too)
1 teaspoon vanilla extract
1 tablespoon packed brown sugar
1 teaspoon Earth Balance (optional)

In a medium sized pot combine oats, cinnamon, nutmeg, salt. Add milk and bring to a boil. Simmer over medium heat, stirring frequently, for about 4 minutes.

Stir in the grated zucchini, chia or flax seeds, dried fruit, brown sugar, and half the nuts. Cook over medium heat, adding more milk if/when necessary, for another 5-6 minutes. Reduce heat to low. When cooked, remove from heat and stir in vanilla.

Pour into bowl and top with remaining nuts and butter. YUM!

Friday, September 9, 2011

Spiced Sweet Potato Fries with Maple BBQ sauce


Wow - what started out as a silly little snack attack turned into a full-blown production. I was looking for something healthy to nosh on and when my psychotic raid of the cupboards turned up nothing, I set my sights on the fridge. There were a few sweet potatoes left from some lofty menu plan involving a curry lentil stew that never materialized, so I grabbed some and pondered their fate.

I picked up the cookbook that has taken up permanent residence on the kitchen counter to find some inspiration and happened across this recipe. Quick. Easy. And way better than a bag full of chips! The best part was that the Bear - having never (seriously, never) tasted a sweet potato - was totally bowled over by these yummy little critters. Super score!!

Posted a quick snap on the Facebook page and the response was so overwhelming I had to share. Hope you enjoy them as much as we did!

Spiced Sweet Potato Fries with Maple BBQ Sauce
Recipe adapted from Easy Green Organic

4 medium to large sweet potatoes, cut into 1-2" strips (I leave the skin on for maximum nutrient value but original recipe calls for peeled)
2 teaspoons ground cumin
2 teaspoons ground coriander
2 teaspoons garlic powder
2 teaspoons sweet paprika
2 teaspoons salt
1/2 cup olive oil
2 tablespoons fresh chopped parsley
sea salt for sprinkling

3/4 cup barbeque sauce
3 tablespoons maple syrup

Preheat the oven to 400 degrees.

In a large bowl mix the cumin, coriander, garlic powder, paprika, olive oil and salt. Add the sweet potatoes and hand-toss until they're evenly coated. Add the parsley and mix well.

Lay out the potatoes in a single layer on a large baking sheet and bake, stirring once or twice, for about 30 minutes or until the edges are browned and the potatoes are cooked through.

While they're baking, mix the barbeque sauce and maple syrup together in a small bowl.

When the fries are done, sprinkle them with the sea salt and enjoy!! They're a great snack on their own or a perfect side for these BBQ Portabella Sliders.

Note: mine tend to come out kind of soft rather than crispy - which I actually like. You may need to make a couple of batches to come up with the consistency and texture that you prefer. If anyone manages to make them crispy, let me know how you did it! 

Monday, September 5, 2011

Chocolate Balsamic Cake with Red Wine


For those of you who don't know me, I'll let you in on a little secret - I don't really love chocolate. But put a glass of red wine in front of me and suddenly I'm prepared to take the most hard-core chocoholic to the mat over the last piece of whatever's in the house that even hints of chocolate.

So when I came across this recipe for vegan chocolate cake from Amy over at Fragrant Vanilla Cake, I just about flipped. For all you dedicated vegans out there, your karmic reward is this incredible recipe that non-vegans would likely never bother to seek out: chocolate cake held together not by eggs, but by red wine. Yes. Seriously. Oh, and with a cherry on top: a couple of tablespoons of balsamico that pull double duty for adding flavor as well as working with the baking soda to make this puppy rise.

I have to admit, having been raised on deliciously buttery eggy cakes, I was totally skeptical about how this was going to turn out. But I was determined to try a vegan cake and this one sounded way too interesting to pass up. Still, I braced myself for it to be totally dry or exhibit some other kind of weirdness and just kept my fingers crossed that it would at least be "passable"- lest I endure a resounding chorus of "I-told-you-so's" from my family. So imagine my joyous surprise when I took the first bite of this gobsmacking goodness...go ahead, imagine it. If you're picturing a cartoon character with eyes bugging out in tune with a fire alarm and passing out with little pink hearts and stars circling my head...well, you're obviously as weird as I am, but you'd be spot on.

Incidentally, as much as I'd love to, I cannot take credit for the awesomely awesome term "gobsmacking" - I shamelessly stole it from PeaSoupEats, a cheeky vegan blogger in Cornwall who if you don't already know, you absolutely must. In fact, I highly recommend pecking around her delightful little blog whilst stuffing yourself with this delectable cake!


Chocolate Balsamic Cake with Red Wine 
Recipe adapted from Fragrant Vanilla Cake
Makes one 9-inch single layer cake*

*if you want a double-decker - which, now that I've tried it, I highly recommend - double the quantities below to make two cakes and sandwich some yumm-o frosting in between

1-1/2 cups whole wheat flour (pastry flour works best, but naturally I didn't have any so I used regular wheat flour)
1/3 cup unsweetened cocoa powder
1 tsp baking soda
1 tsp sea salt
1 cup sugar (original recipe calls for maple sugar - use it if you have it!)
1/2 cup olive oil
1 cup red wine
1 tablespoon pure vanilla extract
2 tablespoon balsamic vinegar

Preheat the oven to 375 degrees and position rack in center of oven. Amy recommends lining the cake pan with parchment paper and coating the parchment paper (and pan sides) with nonstick spray. I didn't have any paper on hand (found out the hard way a few months ago that wax paper is NOT a viable substitute) so I just used non-stick spray on a standard 9" non-stick cake pan and it worked fine.

Anyhoo. Onwards...

Whisk flour, cocoa powder, baking soda, salt, and sugar in a large bowl to blend well. Next, whisk oil, wine, and vanilla extract together in small bowl to blend well, then whisk into the flour mixture until well blended. And while the bottle is open, feel free to pour yourself a glass and toast yourself for endeavoring to bake something.

Whisk in the balsamic vinegar and stir quickly until fully combined. Transfer cake batter to prepared pan and bake cakes until a toothpick inserted into center comes out clean, about 25-30 minutes.

Cool cake completely in pan on rack, about 1 hour. Cut around sides of pan to loosen. Turn cake out onto platter and peel off parchment paper (if you used it). Let your masterpiece cool completely before frosting.

Use your favorite frosting (there's a great one on the original recipe page that uses Tofutti cream cheese and tons more on Amy's site). You'll want to be generous with the frosting, not only because it's delicious but also because eggless cakes, whilst they can be surprisingly moist, do tend to be a little more delicate than their eggy cousins and will crumble more readily under pressure.

If you want to make it insanely decadent - go ahead, you deserve it - top it with some vegan caramel sauce to bliss yourself out completely.

Days later, I'm still seeing hearts and stars...
Wednesday, August 31, 2011

What I Ate Wednesday #3

Woohoohooooo!!! I'm super psyched that it's Wednesday!

Normally it's just another day of the week, but lately it's been oodles of fun meeting new bloggers through the Peas & Crayons blog hop...or link party or whatever the heck you want to call it...

I've been MIA for the past couple of weeks because frankly, I ran into a string of less-than-overwhelming recipes that just weren't post-worthy. On the positive side, I lost 6 pounds...a lovely state of being that I'm sure will be short-lived now that my recipe radar appears to be back in working order, but one that I'm more than happy to trade in for a good meal!

Quinoa and Zucchini have been on my list of favorite things this week - partially because we have a boatload of it in the kitchen but probably more so because Q and Z are my favorite letters besides X, which I also find strangely appealing...

Before anyone bothers to psychoanalyze that too much, here's some of the yumminess that I've been snoshing on this week...

Stuffed Zucchini with Spanish Rice and Vegan Cheese (recipe coming soon)

UH-MAY-ZING Cherry-Zucchini Bread

Zucchini Bread Oatmeal (recipe coming soon!)

E2D Seared Tofu and Sassy Swiss Chard

Quinoa & Black Bean Salad with Orange-Lime Vinaigrette 

Quinoa Stuffed Peppers with Rigatoni Marinara (recipe coming soon!)

If you want to join the party, head over to Peas & Crayons and sign yourself up!


Saturday, August 27, 2011

Sassy Swiss Chard with Raisins and Pumpkin Seeds


Sooooo here's what became of the two pounds of Swiss chard that we hauled out of the garden yesterday. Please excuse the sad photo - I was too lazy (and hungry) to set up a decent shot. I realize it looks like one big rendolent mess, but it was really quite yummy.

I've been getting quite bored of "recipes" featuring greens cooked in olive oil with some salt and pepper (can one really even call that a recipe??) so I pulled one from yet another new favorite book, Pretty Delicious by Candice Kumai - you might remember her from Top Chef's first season? Although this is almost as simple, it's got some nice nuances that make it look far more complicated than it is.

Anyway, I love this book because like me, she's not a fan of "diet" food, favoring "smart swaps" and delicious real food that keeps calories to a minimum without sacrificing flavor. Most (if not all) of her recipes can be easily "veganized", which is a big fat bonus.

Enjoy!

Sassy Swiss Chard with Raisins and Pumpkin Seeds
adapted from Pretty Delicious
Serves 6

2 pounds Swiss chard, stem ends trimmed
1/4 cup raw pumpkin seeds
1 tablespoon extra-virgin olive oil
1 small red onion, thinly sliced
1/2 teaspoon sea salt
1 tablespoon fresh lemon juice
1/2 cup golden raisins (I used regular ones since that's what I had, but the golden ones will add a nice color contrast)

Cut the colorful stems from the leaves and slice them cross-wise into 1/4" pieces. Place them in a bowl and set aside.

Next, work in batches to cut the greens into a chiffonade: pile a few on top of each other and roll them lengthwise (think "thick cigar"), then slice them cross-wise into 1/4"-wide ribbons. Place them in a separate bowl, NOT on top of the stems - otherwise you'll have the dig the stems out from underneath like I did. That's what I get for not reading the recipe through first. Lesson learned.

Ahem...toast the pumpkin seeds in a small skillet over medium heat, shaking the pan often, until they're nice and fragrantly toasty, about 3-4 minutes. Transfer to a small non-plastic bowl and set aside.

Heat the oil in a large (really large) non-stick skillet over medium-high heat. Add the onion and salt and cook about 4 minutes, stirring often, until it begins to soften. Next stir in the chard stems and cook those for about 4 minutes until they, too, begin to soften. Then throw in the greens and - you guessed it - stir often. You'll really need to keep stirring to get the fresh stuff down to the cooking surface of the skillet. It looks like an impossible mound but it will eventually cook down. Just keep stirring...it should only take another 4-5 minutes.

Finally, stir in the raisins and remove from heat. Sprinkle with the lemon juice and turn everything out onto a serving platter. Finish by topping it with the toasted pumpkin seeds and enjoy!


Wednesday, August 24, 2011

Quinoa & Black Bean Salad with Orange-Lime Vinaigrette


I'm crazy for quinoa these days. Mom bought a monster-sized bag so I've been looking for good uses - and this refreshing salad with a fruity twist is definitely one of them. The sweetness of the mangoes, the brightness of the mint, the kick of the jalapeno and the crunch of the jicama make it a groovy little party in your mouth. Woohoooooo!!!

I've also been obsessed with Clean Food - one of my favorite cookbooks that I left for mom in the hopes that she might divine some inspiration. Alas, she enjoys eating food more than making it so I have reclaimed this little baby for myself. There's something about eating clean that seems to replace cravings for "comfort food" with a ravenous desire to eat loads of fruit and veggies, drink gallons of water and tea, and do insane amounts of yoga - a state of being that I sorely need to get back in touch with.

So far, so good!


Quinoa and Black Bean Salad with Orange-Lime Vinaigrette
Adapted from Clean Food by Terry Walters
Serves 8

3/4 cup quinoa
1-1/4 cups water
pinch of sea salt
3 cups cooked black beans (or 2 cans, drained and rinsed)
1/2 cup chopped red onion
1 mango, peeled, pitted and diced
1 cup jicama, peeled and diced
1 cup cherry tomatoes, halved
1/4 cup toasted sunflower seeds (optional)
1/4 cup toasted pumpkin seeds (optional)

Orange Lime Vinaigrette
1/4 cup extra-virgin olive oil
2 tablespoons lime juice
1/4 cup orange juice
2 jalapenos, seeded and minced
1/2 cup chopped fresh mint
sea salt and fresh cracked black pepper

Bring water to a boil and add the quinoa and salt. Cover, reduce heat and simmer until all water is absorbed (about 15 minutes). Remove from heat and set aside to cool.

Combine beans, onion, mango and jicama in a large bowl. Fluff the cooled quinoa with a fork, add to bowl and fold gently to combine.

In a small bowl, whisk together the vinaigrette ingredients. Pour the dressing over the salad and toss to coat.

Fold in the tomatoes and seeds just before serving. Deeeee-lishhhhhh!


Monday, August 22, 2011

Vegan Cherry Zucchini Bread


If anyone has been wondering why the posts have been so sparse lately, here's the scoop: I've run into an unusual string of utterly average recipes that, whilst I managed to make them edible, I've not found to be post-worthy. [insert long string of crude expletives here]

Admittedly, many have been based on recipes that attempt to "veganize" something familiar and I'm sorry to say, some things just don't work in vegan form. And before anyone gets all up in my grill about my lack of kitchen skills, let me assure you that I always follow recipes with unfamiliar ingredients with obsessive precision to make sure I don't do them any undue injustice...and because there are few things I find more mortifying than watching someone politely choke down a bad meal that I prepared.

Having said that, this little string of failures has only increased my resolve to find some seriously kick-ass vegan recipes that will knock the smug socks off my family, who is always quick to say, "We told you so!" whenever a vegan recipe fails to transport them to culinary nirvana.

So trust me when I tell you that this next one is a real winner.

In fact, I was feeling so competitive that I also made Anna Getty's non-vegan version from Easy Green Organic and did a side-by-side taste test. Can you guess which one is vegan?


Buon appetito!


Heavenly Cherry Zucchini Bread
Adapted from this recipe at Hell yeah It's Vegan
Makes 1 loaf

3 tbsp ground flax seeds whisked into 1/4 c + 1 tbsp warm water
1/4 cup vegetable or canola oil
1/4 cup applesauce
1 cup light brown sugar
1/2 teaspoon vanilla
1 cup grated zucchini, packed
1/2 cup all-purpose flour
1/2 cup whole wheat flour
1/2 teaspoon salt
1/2 tablespoon baking soda
1/2 teaspoon baking powder
1/2 tablespoon cinnamon
1 teaspoon nutmeg
1 cup dried cherries (or raisins, or apricots or whatever you may fancy)

Preheat the oven to 350. (No, I still don't have an oven of my own. I've been visiting Mom this month!)

Grate your zucchini. Make sure to pack it before measuring.

Mix together flax seed mixture, oil, applesauce, sugar, and vanilla.

Add zucchini and stir till just combined.

In a separate bowl, sift together remaining dry ingredients. Add them to the wet ingredients and stir just until moistened and everything is incorporated evenly; some lumps are fine. Add the dried cherries (or any other fun extras) now.

Bake at 350 for 45-50 minutes, or until a knife inserted in the center of loaf comes out clean. I recommend checking it after 40 minutes.

Let it cool a few minutes before removing and slicing.

Crumble Topping (optional)

If you want to make this a really decadent treat, top it off with this sweet crumble. I don't have a snap of this as I'm really trying to cut out blatantly unnecessary calories these days but I just know it would be heavenly. If you make it, send me a pic and make me insanely jealous!

1/4 cup all purpose flour
3 tablespoons brown sugar
1 tablespoon pumpkin seeds
2 tablespoons unsalted [vegan] butter

Combine the dry ingredients and cut in the cold butter until the mixture resembles a coarse meal. Set aside and sprinkle evenly over the batter just before baking.

Note: I was totally out of sorts yesterday and my process was totally out of order. I actually forgot the zucchini so that didn't get added until I was about to pour it into the pan. Oh, and the egg substitute - the flax seed mixture - yeah, totally didn't see it sitting in the corner until I had already poured the batter in the pan. Despite having made a huge mess remixing and re-pouring, it still turned out great. Curious to see what following the directions yields next time...

Thursday, August 11, 2011

BBQ Portabella Sliders

Photo courtesy of How Sweet It Is

Let me first start off with a confession, lest I be stoned, flogged or otherwise ostracized for pulling a fast one: this is NOT vegan cheese in the photo.

Sorry.

Having said that, the reason I'm sharing this is because these scrumptious little suckers are a great example of a Sneaky Vegan meal (sans or substituting the cheese) that was prepared and posted by Jessica from How Sweet It Is: an awesome blogger who - as a self-outed vegetable hater - is about as far from vegan as one can get and still posts some really amazing vegan and vegetarian stuff.

It just goes to show that great vegan food can be found anywhere - even in the most unlikely of places, kitchens and blogs. So when you're looking for good vegan recipes, definitely check out the usual suspects, but stay open to other "omni-sources". You never know where more yummy nuggets like these might be hiding...

Thanks Jessica - I can't wait to try these!


BBQ Portobello Sliders
recipe courtesy of Jessica at How Sweet It Is
makes 6 sliders

6 baby portobello stuffing mushrooms
6 slider buns
1 teaspoon smoked paprika
1 teaspoon onion powder
1/2 teaspoon chili powder
1/2 teaspoon black pepper
1 tablespoon olive oil
1 red onion, sliced
2-3 ounces gouda, sliced into squares (not sure vegan gouda exists, but any vegan cheese will do)
1 avocado, sliced
1/2 cup bbq sauce, for drizzling and dipping

Heat a skillet on medium-low heat and add 1/2 tablespoon olive oil. Add sliced onions with a pinch of salt and let caramelize, stirring occasionally. Cook for about 8-10 minutes, then turn off heat and set aside.

While onions are caramelizing, brush mushrooms with remaining olive oil and sprinkle both sides with pepper, paprika, onion and chili powder. Heat a skillet ( or a grill) on medium heat and cook until mushrooms are juicy and tender – about 5 minutes on each side. With 1-2 minutes remaining, add a slice of gouda on top to melt.

Assemble sliders by placing the mushroom on the bun, then top with onions, avocado, and a hefty drizzle of bbq sauce.

Note from Jessica: if you can’t find slider buns in your local store, just buy dinner rolls. I did this for years before grocery stores actually started selling slider buns!


Update: made these for Mom and they were delish - even with vegan cheese =) Pair them up with these Spiced Sweet Potato Fries and use the Maple BBQ Sauce in that recipe. Heaven!

Wednesday, August 3, 2011

What I Ate Wednesday #2

Sooooo y'all wanted to know what a blog hop is, yeah?


From what I understand (in my embarrassingly limited knowledge of the blogosphere), a blog hop is this fun little dealio wherein bloggers convene to introduce themselves and meet other bloggers. One of my personal favorites is "What I Ate Wednesdays" at Peas and Crayons where bloggers are invited to share their meals for the week. Everyone adds thumbnail image links to their blogs and it's a super cool way to find other like-minded bloggers as well as some great new recipes.

So here's what I've been cooking up this week:


Blackberry-Peach Vegan Crepes

Lavender Vanilla Oatmeal

Sun-dried Tomato-Basil Risotto with Balsamico
Raw Vegan Salted Chocolate Truffles
If you've been reading for a while you'll probably notice that a few of these are making repeat appearances. I've been super crazy busy the past couple of weeks and sadly, I haven't had time to play with many new recipes. That's the beauty of having a stockpile of go-to recipes that you know will be winners every time. Got to try them out on some out-of-town guests too and they were surprised, stunned, downright shocked to find out (afterwards) that they were vegan meals. Win Win WIN!

So now that y'all know what a blog hop is, would you guys be interested in sharing links to your recipes here if I start one?
Related Posts Plugin for WordPress, Blogger...